"Pixel control" is designed to find the needed images on the screen. And depending on the image found, it allows to Replay other Replay branches. Moreover, in addition to that, it gives an opportunity to click on the interface element (the image of which was found). Pixel control can be created during the Record process, if you press either NumLock or CapsLock twice, or you can create it after Record through "Smart Control" panel.
During ordinary Replay (without Pixel Control) AutoClickExtreme "sees" window frames instead of windows and "knows" some of their properties (such as title, readiness for input, etc.) But Pixel Control gives an extra opportunity to find the needed images in windows and to bind mouse actions to these images. On the other hand, if to use only Pixel Control, the automation process will be more complicated, because window interface often changes in programs where actions are replayed, and you'll need to think more properly about creating a Pixel Control event during Record. Therefore, we recommend you to use Pixel Control as an addition to an ordinary Record at the most important points of task automation.
Pixel Control is essential if you work in a Web Browser, as you have to wait for complete update of all web page elements. Here you need a click not only in a certain place, but also at a certain time. Pixel Control allows to wait for the needed page state without excessive waiting pauses.
Pixel Control can be created either During the Record process or after it through editing the event manually in the Table of events.
Pixel Control creation at the stage of Record can be divided into 4 steps:
 1.
When you press NumLock twice during Record, the screen freezes and the mouse
cursor acquires the form
 ![]() . The Record temporarily stops. At this moment You can diagonally select the
area on the screen, which will be found during Replay (if you press Escape,
the Record continues, and Pixel Control will be cancelled at this point).
. The Record temporarily stops. At this moment You can diagonally select the
area on the screen, which will be found during Replay (if you press Escape,
the Record continues, and Pixel Control will be cancelled at this point).
2. When the image is selected, it appears on the
screen framed, and the cursor over this area has the form ![]() .
At this very moment you can define a mouse event which will be made during
Replay (if you make a double left mouse
button click, the program will also make a double left mouse button click
during Replay, etc.). If you press Enter,
AutoClickExtreme (during Replay) will simply look for the needed image on the
screen without any additional mouse events.
.
At this very moment you can define a mouse event which will be made during
Replay (if you make a double left mouse
button click, the program will also make a double left mouse button click
during Replay, etc.). If you press Enter,
AutoClickExtreme (during Replay) will simply look for the needed image on the
screen without any additional mouse events.
3. Right after defining the needed image and mouse event with it, AutoClickExtreme makes a test 10-second search of the necessary image and does the needed mouse actions with it, if there are such. In case of a failure, AutoClickExtreme offers to interrupt the Record.
4. Record continues in the ordinary mode.
You can edit an already created Pixel control manually in the Table of evens or insert a new Pixel Control

You
can also insert or edit a Pixel control event after Record. In the Table of
Events in contextual menu you can see the item
![]() , which gives
access to "Smart Control" panel. If you
choose
, which gives
access to "Smart Control" panel. If you
choose ![]() you can
easily get to the dialogue box of Pixel Control editing. If there is a Pixel
Control in the Table of Events, it is enough to click twice on the
corresponding event
you can
easily get to the dialogue box of Pixel Control editing. If there is a Pixel
Control in the Table of Events, it is enough to click twice on the
corresponding event
 .
.
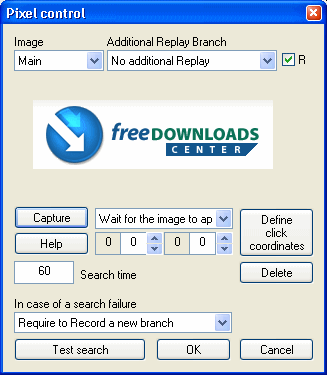
Controls and properties of "Pixel Control" dialogue box.
The image under control is shown
in the upper part of the dialogue box, it can be easily changed with the help
of the button ![]() .
If you press this button, you'll have to go through the following 2 steps:
.
If you press this button, you'll have to go through the following 2 steps:
1. As soon as the mouse cursor acquires the
form ![]() ,
you should select the area on the screen, which will be found during Replay.
,
you should select the area on the screen, which will be found during Replay.
2. The image, after being selected, will appear
on the screen framed, and the cursor over this area acquires the form
![]() . At this point
you can define the needed mouse action, which AutoClickExtreme will carry out
during Replay: you can make a double left mouse button click on the found
image, or single right button click, etc. If you press Enter, AutoClickExtreme
(during Replay) will simply look for the needed image on the screen without
any additional mouse events. So, this event will mean waiting for the
necessary image on the screen.
. At this point
you can define the needed mouse action, which AutoClickExtreme will carry out
during Replay: you can make a double left mouse button click on the found
image, or single right button click, etc. If you press Enter, AutoClickExtreme
(during Replay) will simply look for the needed image on the screen without
any additional mouse events. So, this event will mean waiting for the
necessary image on the screen.
After these two
steps, the "Pixel Control" dialogue box appears once again with an already
renewed image. In AutoClickExtreme there is a unique technology, which is
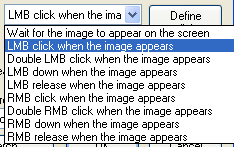
separately described here. In the drop down list
 you can choose
various mouse actions which will be bound to the found image. With the help of
this button
 ![]() you
can change click coordinates without leaving the dialogue box, by clicking on
the displayed image. The event type and the click coordinate is defined
automatically when you capture the image.
you
can change click coordinates without leaving the dialogue box, by clicking on
the displayed image. The event type and the click coordinate is defined
automatically when you capture the image.
The editing field
![]() allows to set a
number of seconds, given to find the needed image during Replay. If You set
zero value, the program will look for the needed images only once without time
limit. If the image is not found during the set time, you can choose any item
in the dropdown list
allows to set a
number of seconds, given to find the needed image during Replay. If You set
zero value, the program will look for the needed images only once without time
limit. If the image is not found during the set time, you can choose any item
in the dropdown list .
On default, the search is considered to be successful if at least one image
from the list is found. If no image is found, AutoClickExtreme will show the
dialog box, where you can choose further actions, each time for a half of a
minute; then it will look for the images again. If after a while you don't
need one of these images (like for example, a dialog box of a file
rerecording), for this Pixel Control you should set "Allow further Replay". In
this case AutoClickExtreme will look for the image for the set period of time,
and in case of a failure it will pass on to the next event. In case or a
search failure you can also set whole Replay branches to Replay. In this case
the Replay will continue from the next event after the set Replay branch is
finished.
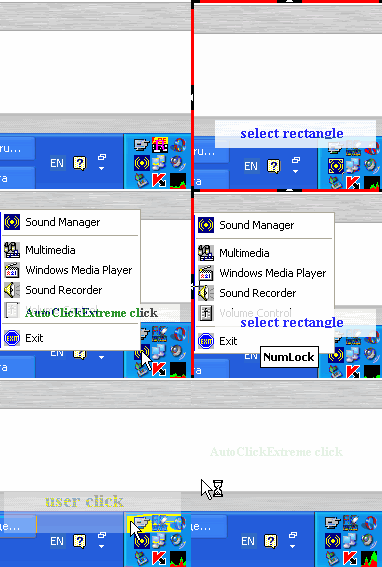
 How to solve the problem of recording Pixel Control of a click on the pop
up menu. After you have chosen the needed menu item image, the menu itself
hides, and that's why during the test search the image is not found. The
problem is easily solved, if you call the menu once again right during the
test search (at the stage of Record). Thus, AutoClickExtreme finds the image
successfully and continues the Record. In this picture you can see an example
of work with the Tray menu. There are two Pixel Control events here: one -
calls the menu, the other - clicks on a menu items. The first Pixel Control
event is created as usual, by selecting a rectangle and making a right mouse
button click on it. The second Pixel Control event is created almost like
this, but you should make an additional click to call the menu the second
time.